Finger Strength Training for Climbers
There is a lot of information out there about managing finger strength gains, the best methods, the best practices and what not to do! Which is why in this series, we will be clearing the fog, keeping it simple and breaking down:
- Methods of training finger strength
- Grip types
- Avoiding and managing injuries
- Practical finger strength testing session
So let’s jump straight in…
Methods of Training Finger Strength
There are essentially 4 different methods in which you can train your finger strength:
- Climbing: Bouldering or climbing on a board
- Campusing: Either on a campus board or boulder wall
- Fingerboarding: Isometric hangs
- Lifting: Taken from grip strength sports
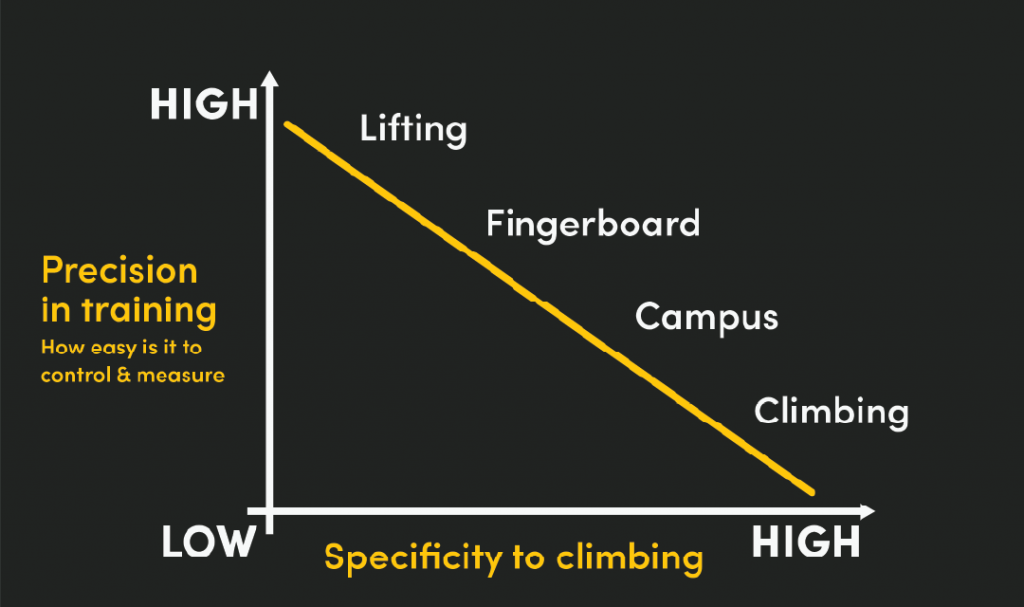
However each method comes with its own level of precision in training, in other words how easy it is to control and measure compared to its own level of specificity to climbing:
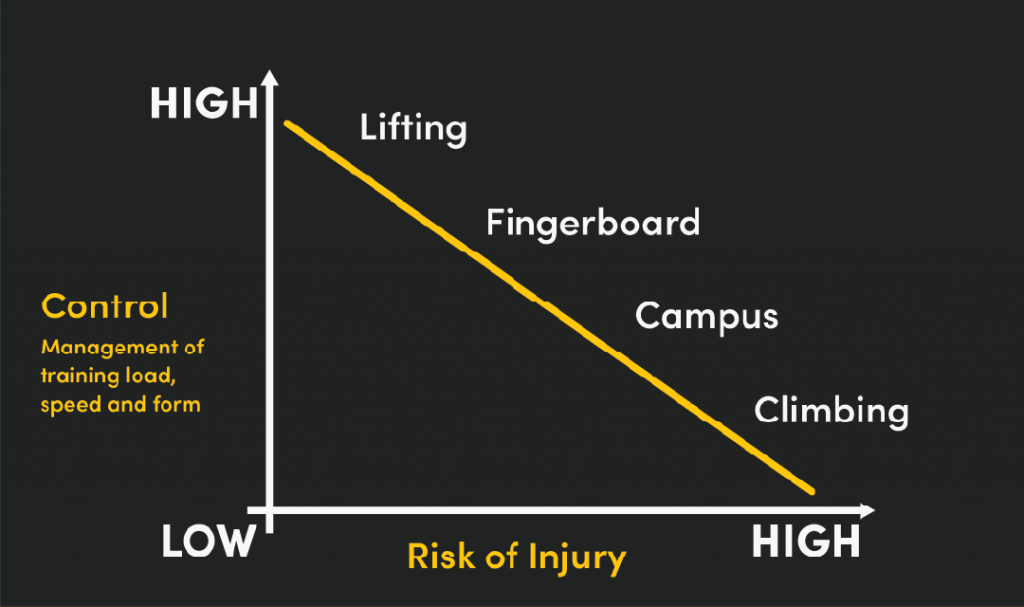
Moreover, each method comes with its own ability to control management of training load, speed and form, and level of injury risk:
Pros & Cons
Climbing: This is the most specific exercise to work on finger strength, however it’s harder to manage the load, grip types and the speed of contractions.
Campusing: This is good for specific catch and release, as well as stable grip types, but load isn’t easily measured.
Fingerboarding: As you probably already know this is extremely measurable, grip specific hanging but there is little to no movement specificity.
Lifting: Also an extremely accurate and controllable way to train finger strength, but no other muscles in the chain are used.
Using Each Method
Climbing: This is the primary way to build sport specific strength. Which can also be used all year round, however higher intensity sessions should be carefully monitored.
Campusing: A great method to specifically target contact strength. Should be used in short periods of training before a peak or in a power phase.
Fingerboarding: Excellent for specific grip type training! Large protocol variety making it easier to use all year round.
Lifting: Super accessible, as it’s easy to do anywhere. Physiotherapists favoured tools for injury rehab and prevention. Also a very handy tool for working weaker individual fingers.
Grip types
The age old question – what grip position is the best?
As an example, let’s look at Aidan Roberts, Dave MacLeod and Will Bosi who are all high level climbers, who each have different specific grip strengths.
- Aidan is strongest on high angle crimps, meaning he’s back 3 dominant.
- Dave is strongest on front 3 drag, meaning he’s open grip dominant.
- Will is strongest on half crimp, meaning he’s front 3 dominant.
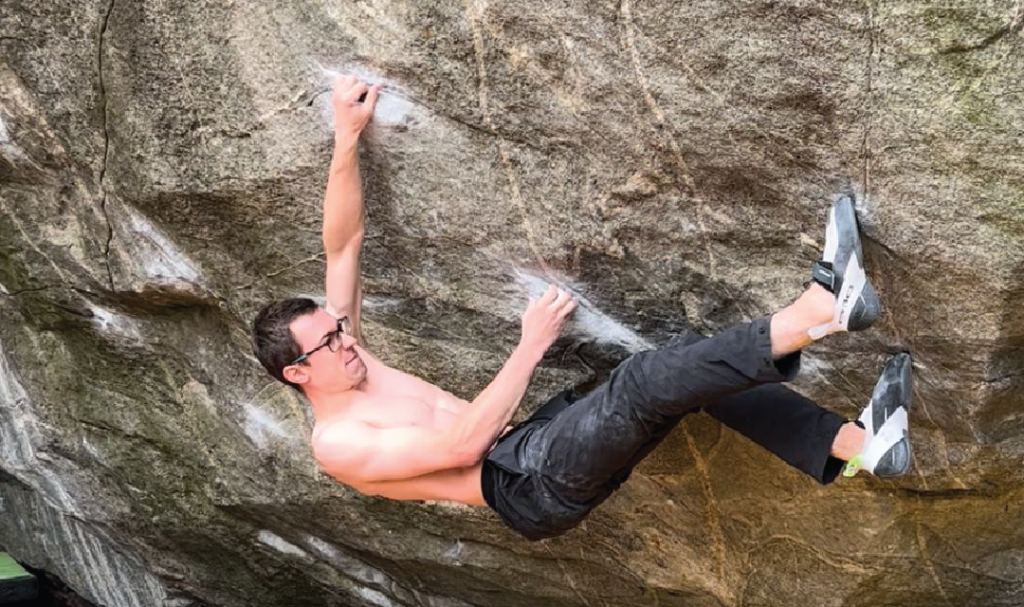
Each uses their strength to their advantage and as a result will move slightly differently on the rock.
Therefore, no one specific grip is ‘best’. Typically, the most appropriate grip position is the one which matches the demands of your project or the area that you want to climb in. Another option can be for building resilience/load robustness in specific grip positions. Remember, what doesn’t get your attention, probably won’t get changed!
What grip positions should you train?
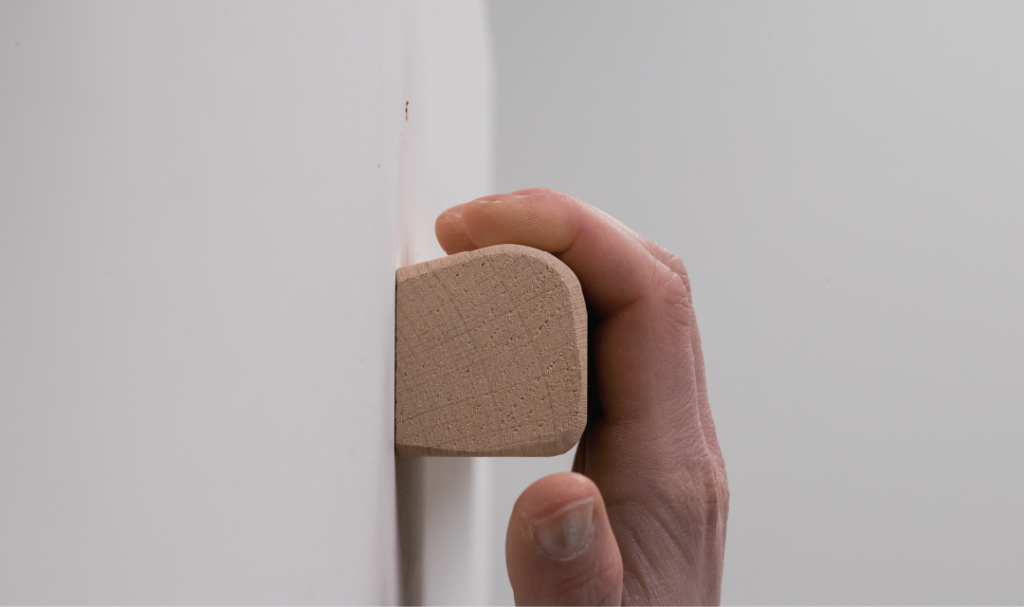
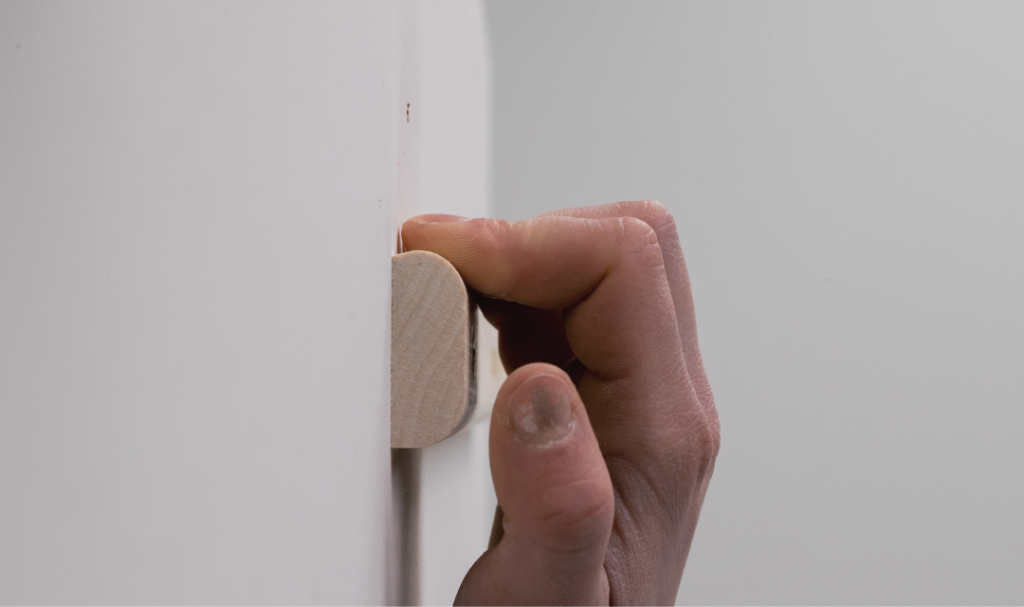
- Half crimp: This is best ‘all rounder’ for training strength as it is arguably more transferrable than other positions.
- Front 3 drag: Good for catching holds and using pockets. Usually this is a slightly lower risk grip position to train.
- Back 3 half crimp: Good for those with weaker pinky fingers. Higher risk than drag positions.
- Front 3 half crimp: Good for big moves (pinkie doesn’t catch) and smaller width edges. Higher risk than drag positions.
- Full crimp: Good for small edges. Due to the higher forces put through the joints and pulleys it should be trained via climbing, instead of on a fingerboard – unless you are very experienced, with a suitable training history.
Open or closed positions?
It is thought that open grip positions are lower risk, but this type of training can limit some movement patterns and reduce maximal strength potential across the entire grip type range.
On the flip side, most climbers will find closed positions transfer well to many climbing movement styles and rock types. They are training at a greater joint angle, which creates more stress on soft tissues, so risk and reward need to be accounted for, alongside training methods (load, frequency etc).
What actually happens when we train our grip?
- Neurological adaptations: Typically, these are quick changes that happen specific to a new protocol and include increasing the magnitude, rate of firing and synchronisation of motor units. This also includes coordination (skill) and antagonistic coactivation changes.
- Muscular adaptations: These are whole chain changes from the fingers all the way up the chain to core/trunk, changing factors such as size, muscle architecture (eg pennation angle, fascicle length) and blood supply network.
- Connective tissue adaptations (capsule, collateral ligaments, tendons, pulleys, etc.): Importantly, many connective tissues adapt at a slower rate compared to muscles. Keep this in mind when you are training your grip.
Avoiding and managing injuries
Often, it is not the exercise/ protocol that is dangerous itself. In reality, injuries occur from completing tasks we are not prepared for, whether it is length of time we do not have capacity for, the intensity we are not ready to hold, push or pull and even the frequency at which we load our bodies.
To make sure we are prepared for the demands of the task we want to use the progressive overload principle.
What is progressive overload?
Progressive overload is the addition of training load as time passes (days, weeks, months etc) by changing the key variables of intensity, volume and frequency with the aim of making continuous progress in performance.
How can we progressively overload whilst training finger strength?
- Intensity: Increase the amount of weight held whilst completing a hang on the fingerboard, whilst maintaining the sets, reps and time under tension / volume.
- Volume: Increase the number of repetitions or total time under tension that you complete on a fingerboard, whilst maintaining the intensity.
- Frequency: The often ‘forgotten factor’ which goes into the equation. Increase the number of sessions that you train whilst maintaining intensity and volume.
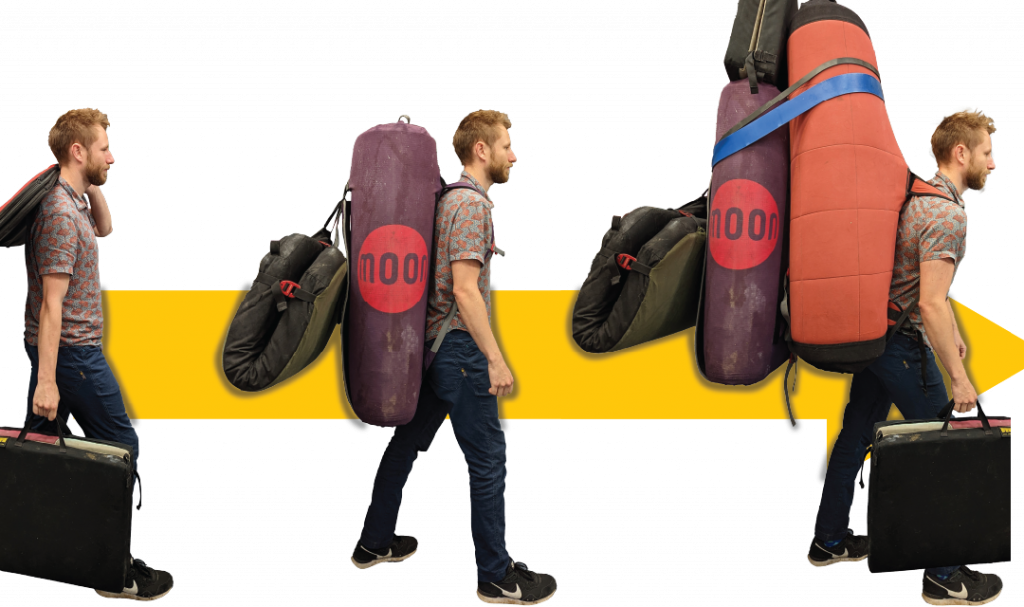

How injury risk can be affected.
- Intensity: Prepares us for the maximal and supra-maximal loads that our fingers are likely to experience whilst projecting.
- Volume: Improves our ability to maintain a chosen (preferred) grip position without moving into a non preferred position whilst completing multiple moves or long duration position holds.
- Frequency: Recovery and adaptation occurs through rest from training. If training frequency is too high, inadequate recovery and repair leads to higher injury risk.
Example: How to progressively overload your training
Here is an *example protocol you can complete to progressively overload your finger strength training:
- Test your finger strength in your preferred grip position for your preferred time under tension.
- Over 12 weeks slowly increase the load from 85% of maximum. Make only small increases in intensity, volume or frequency.
- Aim to use a mesocycle structure of 3 weeks on, 1 week off. As the protocol is 12 weeks long you will complete 3 mesocycles.
- During the “on” weeks you will complete 2 fingerboard sessions. Completing 1 as progressive loaded (session 1) and the other as constant loaded (session 2).
- Progressive loaded: Gradually increase the load by 1-3% increments. Making sure to complete all reps with good form before increasing the load.
- Constant loaded: Maintain the % of max intensity or volume throughout the entire 12 weeks.
- During the “off” weeks you will only complete 1 fingerboard session. This should be the progressively loaded session completed at 1-3% load that you did for the previous week.
- After the 12 weeks, test finger strength as you did for step 1.
*CAVEAT! Remember this is a general suggestion and should be modified to suit individual needs, if unsure speak to your coach.
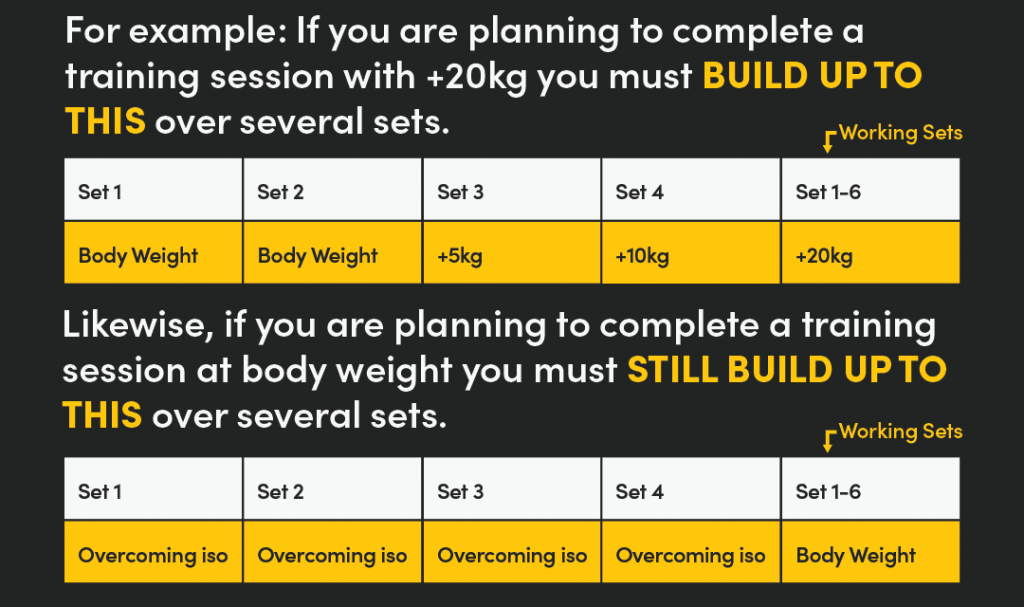
Build up during every session!!!
IMPORTANT – DO NOT start your finger training session at your working load. Gradually building to the working load over 3-4 sets.
If you get injured…
Whilst you will likely try your best to avoid getting injured, sometimes injuries will occur despite best practice! If this does happen, seek tailored advice from a climbing specific physiotherapist or specialist. They will be able to give you the very best advice for your unique situation and are qualified to do so!
Practical finger strength testing session
Part of the process of writing a successful training plan is being able to justify why you are completing a certain workout or exercise i.e. I am training finger strength in the 4 finger half crimp position because I want to become better at using incut crimps on overhanging terrain.
If you are unable to justify why you are including a finger strength session in your training plan, then you may need to reevaluate its inclusion.
To be able to justify the inclusion of a fingerboard session in your training plan you need to consider the following:
- Grip choice: What grip position do you want to strengthen?
- Arm Position: Do you want to train on 2 arms, 1 arm, different arm angles, or using a lifting pinch and edge?
- Hang time: How long should you hang for?
There are a lot of decisions to be made. Let’s explore each one in more detail.
Grip choice
Quite simply you need to choose a grip position that you want to strengthen. Generally the 4 finger half crimp is the best option for most people. However you might want to consider these factors:
- Frequency of grip type: Whilst climbing on your project or at your local gym/ crag is there a grip type that is commonly used? If yes, then it might be worth considering training this grip type so that you are prepared for the demands of the area or your project.
- Stopper grip type: Whilst climbing on your project or at your local gym/crag is there a grip type that commonly stops you progressing up a route? If yes, then you might want to consider training this grip type so that you are able to pass through the stopper moves.
- Chink in the armour: Have you noticed that one of your grip types is particularly weaker than your other grip types? If yes, you might want to consider training this grip to bring it in line with the strength of your other grip positions.
Arm position
For this you will need to workout what arm position and tool you want to train on, then be consistent. Primarily you will need to decide between one of the following:
- Hangboard 2 arm: Typically the go to arm position. Great for intermediate through to elite athletes.
- Hangboard 1 arm: Usually ideal for elite level athletes, or athletes who find the amount of weight they are hanging from their hips uncomfortable to hold.
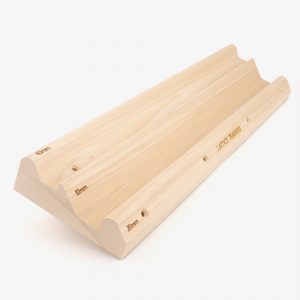
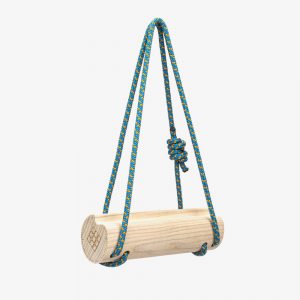
- Lift edge: Great for beginner finger strength training and ideal for athletes who are rehabilitating a finger injury because it allows for accurate incremental loading of weight.
Importantly you should be consistent! Once you have selected and tested in an arm position stick with it throughout the rest of the plan.
Hang time
In its simplest form, there for 3 main types of hang time protocols:
- Max strength focused: Typically a contraction that last 10 seconds or less
- Health focused: Usually a contraction lasting between 20 to 45 seconds.
- Repeater style: Usually they are used to train your power endurance/ endurance and are completed as back to back repetitions with a short rest inbetween. The traditional repeater protocol is a 7 second contraction phase followed by a 3 seconds relaxation phase, aiming to complete 2+ repetitions.
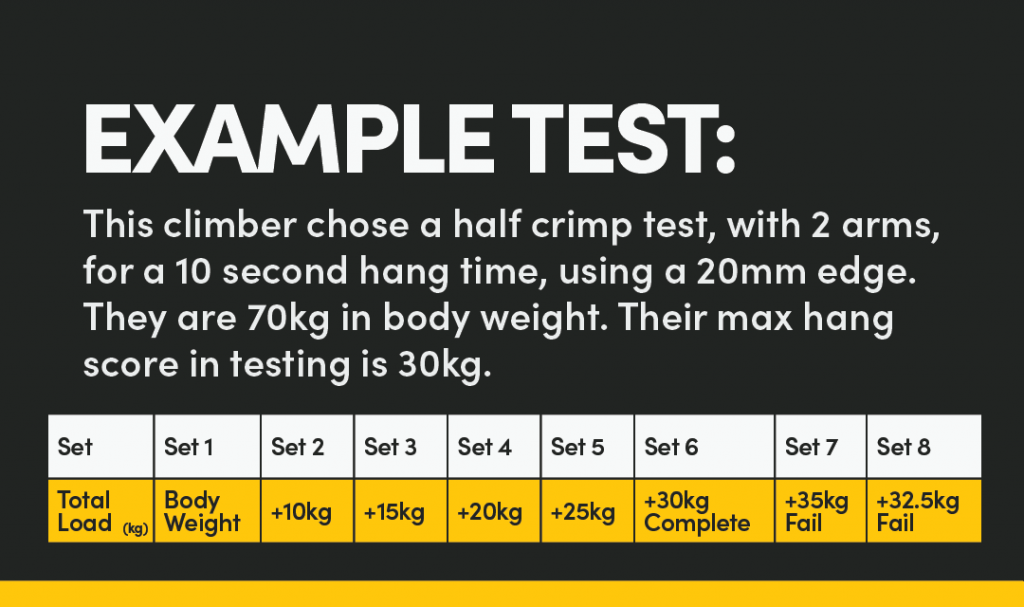
Once you have selected the grip type, arm position and hang time you will want to complete a testing session. The testing session allows you to:
- Benchmark your baseline: This makes it easier to monitor progress.
- Prescribe intensities for training sessions: You can complete your training sessions at a percentage of your testing score.
A simple testing protocol is to complete 4-8 sets in your chosen grip type and arm position, for your chosen hang time on a standardised edge size. Aim to start at a submaximal weight and gradually increase the weight across the sets, resting for 2-3 minutes between sets. Your max hang score is the maximal weight you successfully held for your selected hang time.
Incorporate your results for a plan
Using the example 12 week plan from part 3 in the series the athlete would complete the sessions **as follows, based on their finger strength score.
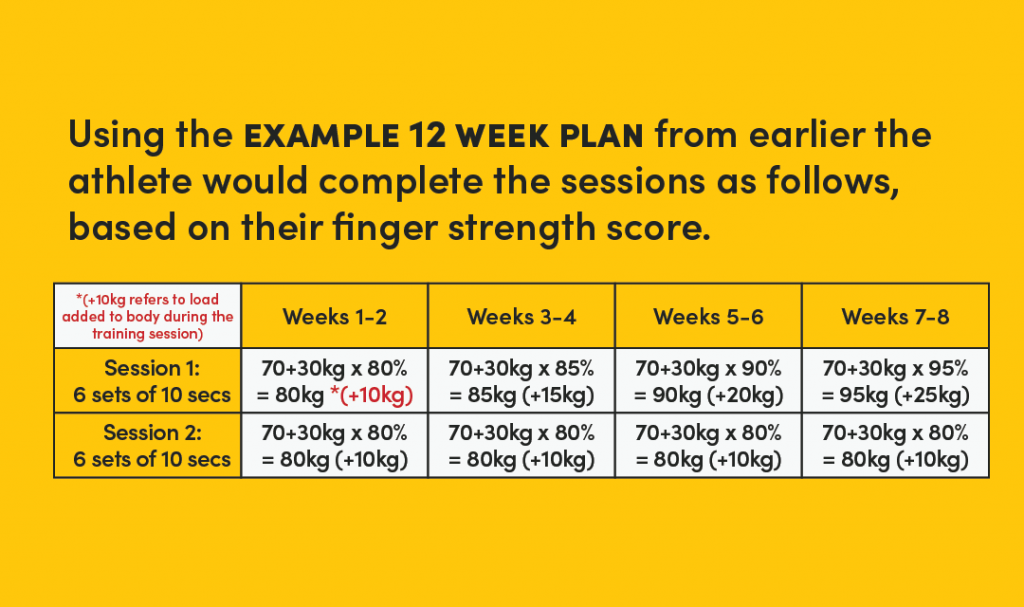
**Caveat: This plan is to demonstrate incorporating your testing results into a plan it is not a plan to be completed. Any training plan should be 100% customised to suit individual needs and training history.
At the start of this article we set out to deep dive into managing finger strength gains, whilst keeping it as simply as possible, by looking at: The methods of training finger strength, different grip types, avoiding and managing injuries, as well as providing a practical finger strength testing session.
Hopefully you have been able to get some good take aways for your own training, but if you are still looking for a little more guidance to take your training to the next level, why not take a look at the customised training plans we offer? Always 100% tailored to you, always hand written by your coach and always supported by the most experienced climbing coaching team in the world.


Hi! Thanks for the info! Is there any benefit to training an edge closer to the DIP crease, as opposed to further away? For example, a 20 mm vs. 10 mm?
The size of the edge will affect the amount of force you can apply — the larger the edge, the more force you’ll be able to generate. The position of the DIP joint influences comfort: if the lift feels more comfortable, you can generally expect to apply more force before it becomes intolerable. Beyond this, the DIP joint’s position relative to the edge has minimal impact.
Hey guys,
My max finger strenght is 49,5 kg, however I recently noticed that after every testing my max finger strenght often improve only: 1kg or 1,5 kg.
Is that becasue heavy load?
is something normal or Am I heading into plateau?
My protocol looks like below
2 session max fingerboards per week where on Tuesday my load is 90% of max, and on Friday my load is 85% of max
I test myself after four weeks
Few deatils to add. I have started climbing around my 30s, but I have had good training background.
Currently my session grade is 7b, and max is 7c, but I want to improve to max 8a/8a + and session grade 7c/7c+
Hi Seweryn. 1-1.5kg every 4 weeks is really good progress! You’ve got nothing to worry about! Remember that gains are slow and steady, compounding over time. 1kg doesn’t seem like much but over months and years, it adds up! You’re doing great!
Based on our data, it’s likely that your fingers are already strong enough to climb your desired grade! Great news! (Try our My Fingers assessment to be certain).
If you try our Remote Assessment, it might reveal that it’s actually another area of your performance holding you back.
Thanks for the great article, definitely a few good takeaways!
I am a bit confused on one of the grip types, specifically half-crimp. I usually perform repeaters on a 20mm edge or 25/30mm edge. I guess my fingers naturally fall into a half-crimp position due to the fact that I’m trying to have all 4 fingers on the board. Until now I always believed that I’ve been doing “drag” hand type as I don’t intentionally half crimp the hold.
I guess my question is, given the mechanical position of a half crimp grip, what edge sizes are we usually to see being used for it? On the image it looks like a 15-20mm edge, which seems insane to try to half-crimp. I’ve never seen this… Usually I imagine people either open hand dragging it or full crimping it.
Would it be logical to presume that to half crimp and actually hang off of our fingers, we should use an edge that is at least 20mm’s deep? Or am I forgetting that there are some beastly strong climbers out there?
Hi Filip! The best edge to use for strength training is one that doesn’t cross the crease where your DIP joint is. For most people this is around 20 to 25mm. However, athletes could train their half crimp on any size edge. It depends what their goals are! You are right though that, as the hold gets smaller, it’s harder to half crimp.
Choosing a grip type for a specific hold size is partly individual physiology and partly individual preference. For some people, the holds get smaller and they opt for an open grip, whereas others will opt for a closed grip. There’s no real rule. It’s whatever feels right for you!
(Although, typically, we don’t encourage people to train on a hangboard/lifting edge in full crimp).
Hello, I just finished my 12-week plan and I’m very pleased with the results. I gained +5kg compared to my first test three months ago! However, now I’m not quite sure what to do next. If I repeat the same plan as the first one (going from 80% to 95% of my max strength score), I will have to spend at least another 6 weeks with a much lighter load than where I was at the end of the third cycle, which seems strange to me.
So, I’m wondering if I should start a new program of 3 cycles from where I left off at the end of the first one, or if I should deload to 80% based on my new max strength test score.
Thank you!
Hi Thomas, we’d recommend a new plan which goes from where you are now – have you considered doing a bouldering or sport climbing plan next? As you’ll continue to train finger strength within the plan, alongside everything else. Hope this helps!
Hey guys,
I would like to know what is the average strength gain for a 12 week program?
Cheers
Hi Med. Thanks for your comment! Unfortunately, it’s not possible to give you a clear answer on this. There are so many factors that go into determining how well someone will adapt to training, from past training history to genetic predisposition to gain strength – not to mention the variance in strength gains in different parts of the body, e.g. body strength vs finger strength.
What a 12 week training plan will give you though is a good idea of what you will need to work on in order to reach your goals and help increase strength where it is most beneficial.
Let us know if you have any further questions.
If you are young, what sort of climbing training is best?
Hi Noah, regardless of age, you should consider your goals and weaknesses, and from there decide what training approach is best. Thanks, Macy
Hi Henry, good question!
We didn’t include any information about this here, it in an effort to make what can be an already confusing topic a bit more simple and easy to understand. However, overcoming isometrics can be a fantastic way to build strength in the finger flexors. Both yielding and overcoming isometrics will build strength, but overcoming isometrics won’t stress the connective tissues as much which can be seen as a positive or a negative depending on what you want to target and develop with your fingerboarding session.
Hope that helps.
~The Lattice Training Team
Hi, is there a reason you don’t include an overcoming isometrics style pull, pulling against an immovable object using e.g. a tindec to measure the force?
Hey guys,
thank you so much for providing this super specific information. This is exactly what i was looking for to start off my first finger board training experiment after 5 years of climbing.
I have one question though regarding the last chart: it says “example 12 week plan” in the header but its 4×2 weeks?! a mistake, or am i missing something?
Cheers
Jakob
What is the reason for the 2nd constant (80%) fingerboard session given in the example? Could you continue to see gains doing only 1 fingerboard sesh (where you ramp up the intensity) per week?
Thanks
These are great questions! Let’s start by answering your second question (Could you continue to see gains doing only 1 fingerboard sesh (where you ramp up the intensity) per week?). Quite simply yes you would be able to continue to see gains because you are applying the progressive overload principle to the session. Over time this stimulus will start to become less effective and the session will provide diminishing returns. To overcome this you could look at either increasing the volume of the session, increasing the frequency that you complete the session each week, or change the protocol (max hangs —> repeaters). This will change the stimulus provided to the body and help adaptations to continue.
Now onto question 1 (What is the reason for the 2nd constant (80%) fingerboard session given in the example?). With training it is very easy to fall into the trap of aiming to constantly make progress and increasing our numbers. The downside to this is that we can fall in the trap of not giving our bodies enough time to adapt to the stimulus. The constant load fingerboard session does this. The intensity is maintained throughout the block which allows connective tissues and structures to adapt to this intensity, becoming more robust.