Side Split Flexibility for Climbers | Lattice Training
Flexibility is often an underrated asset in rock climbing. Climbers typically focus on upper body and finger strength during training, often neglecting lower body flexibility. However, flexibility can be your secret weapon. Being able to move through a wider range of movement and maintain strength throughout opens up new movement possibilities, enabling you to try beta that may have been inaccessible previously. You might not realize how much your lower body flexibility and end-range strength could be holding you back!
In this series, Flexibility for Climbers, we'll be providing you with simple sequences of exercises that you can use 1-2 times a week, in addition to any lower-intensity flexibility sessions. Complete the sequence of exercises in the order shown to ensure that you can get the most out of each individual component.
The sequences are comprised of 4 different sections, designed to take a holistic approach to improving lower body mobility and strength through the range.
Read all the articles:
Improve Your Side Split
What is a side split? (a.k.a. middle split)
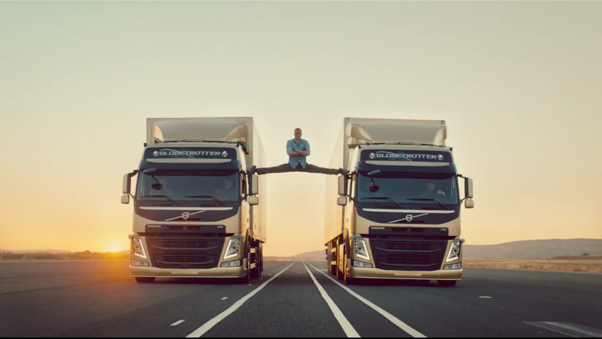
Many of you are probably familiar with the famous image of Jean-Claude Van Damme demonstrating an epic side split between two lorries (featured in an advert about ten years ago!). For those of you who missed it, here it is…
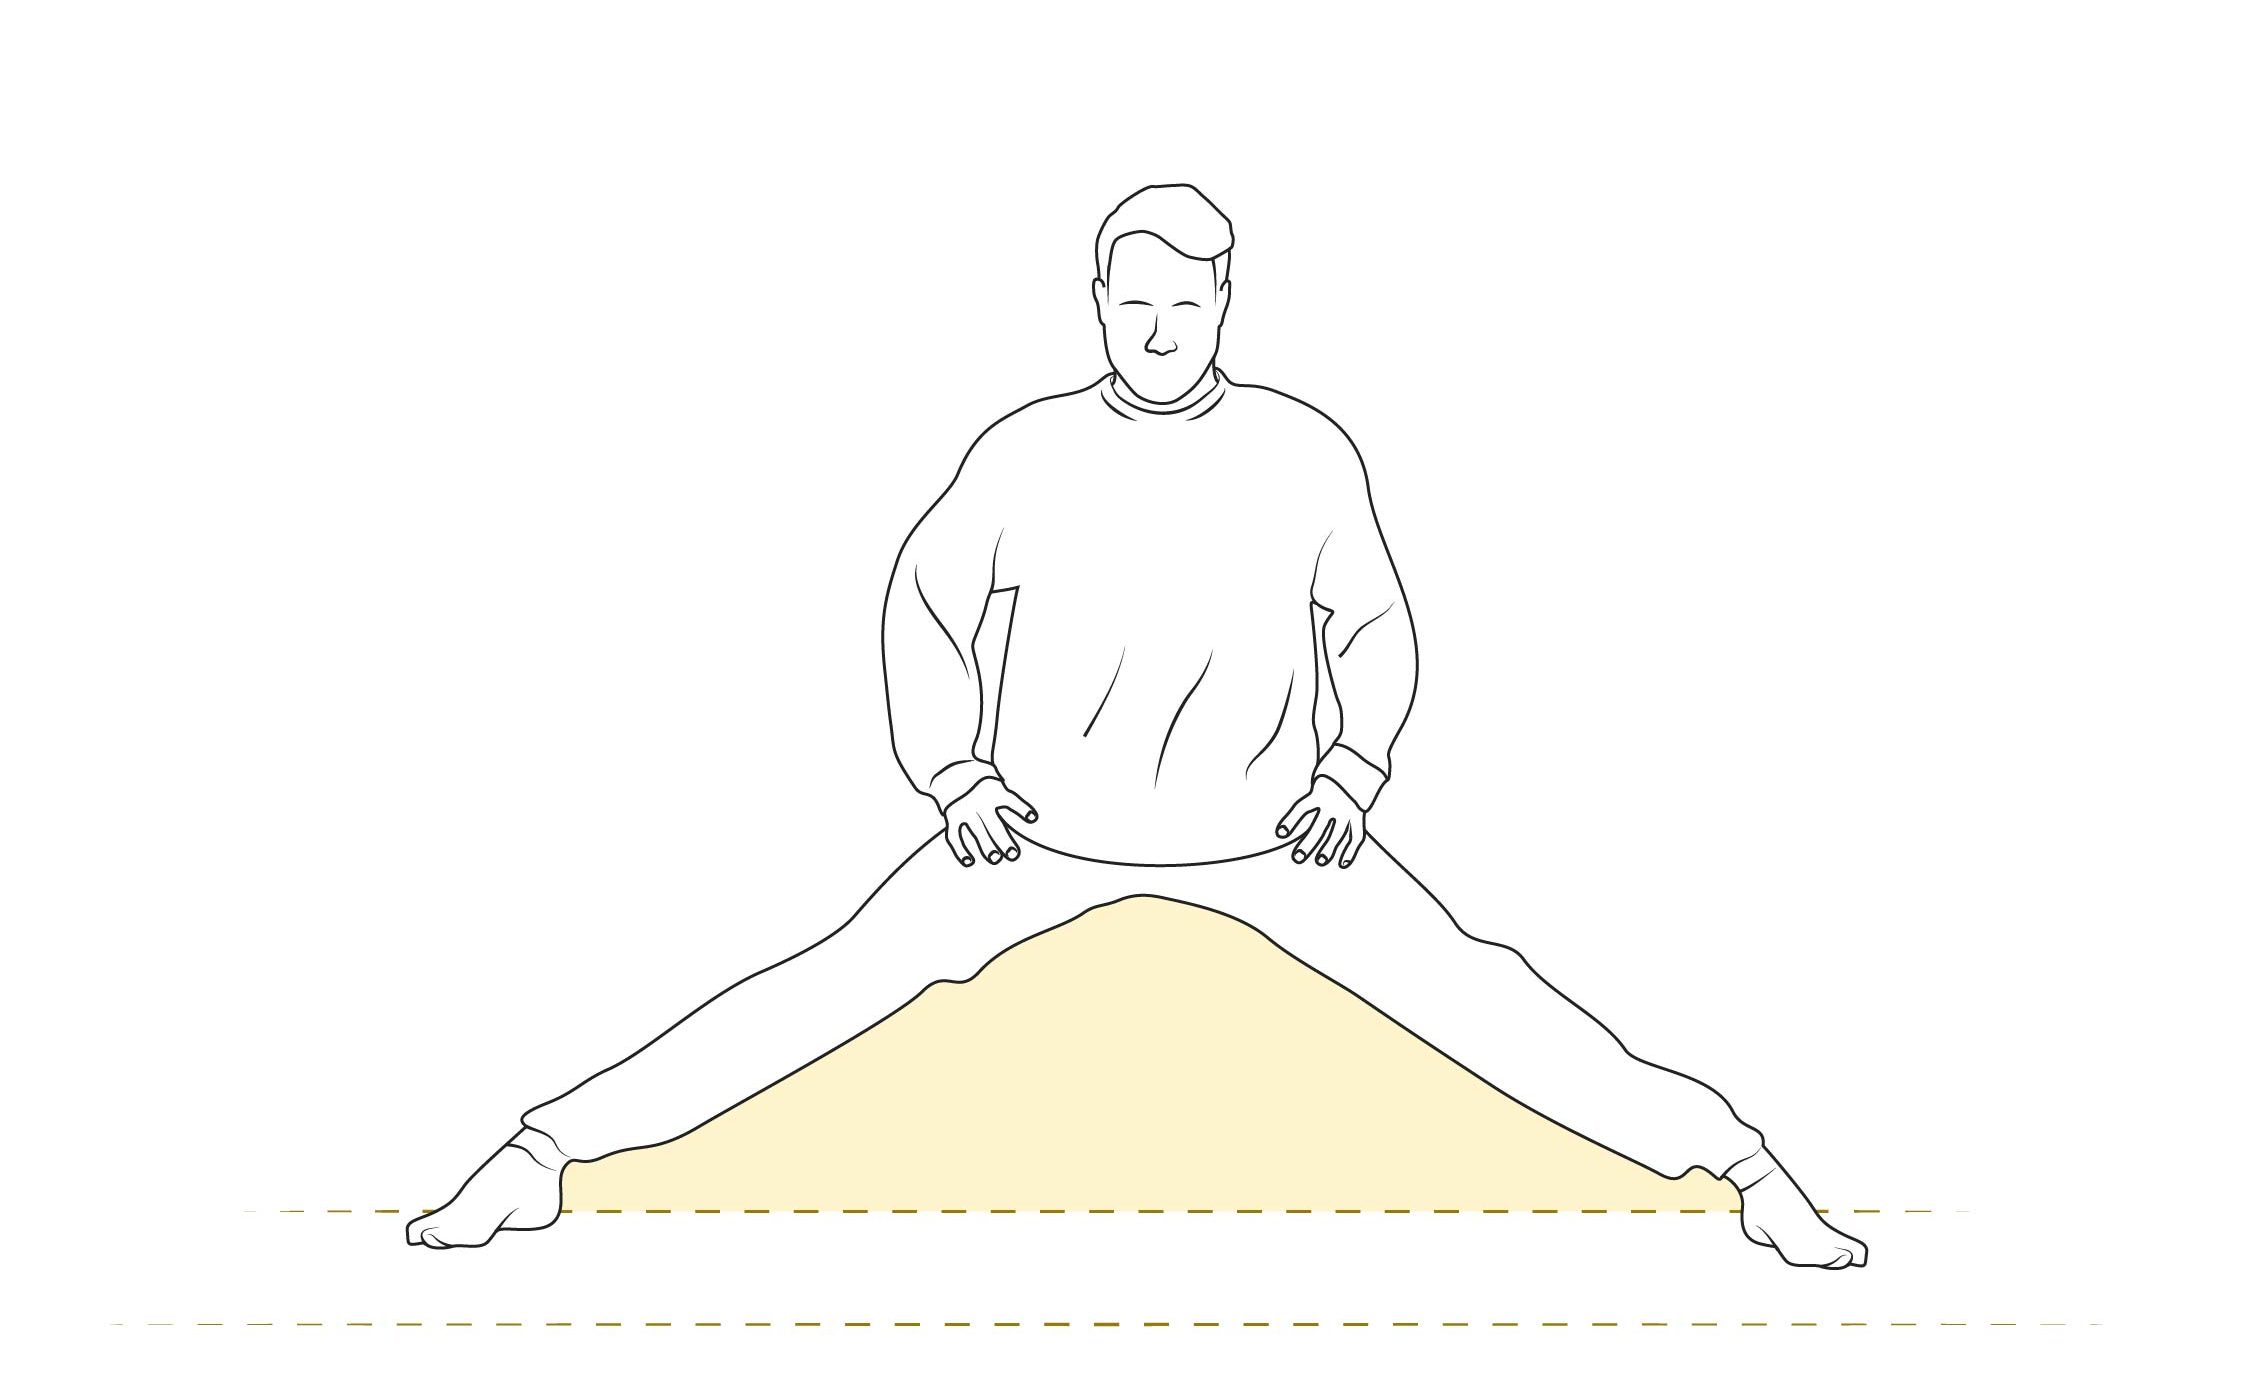
 Put simply, a full side split is when we extend the legs laterally (out to the sides) until our hips are level with the floor.
 ## Why is this useful for climbing?
Of all of the lower body flexibility positions, the side split is probably the most obviously transferable to climbing. Having a good side split is crucial for enabling us to keep our hips close to the wall, reach a wider variety of foot holds, (especially those far out to the sides) and for bridging/stemming between perpendicular walls. Not only is this key for technique mastery but also for resting and movement economy, which research suggests is of equal (if not greater) importance than energy system development. 1
 # 1. Awareness/Control
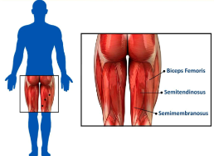
With the side split, it’s important to have some awareness of what it is that’s holding you back. Although the side split is dependent on having length in the hip adductors, surprisingly, one of the common limiting factors for the side split is actually hamstring length. This can easily be assessed using the pike/forward fold.
Pike/Forward Fold Test
This test is to measure your Pike Reach/Fold. Measure depth by reaching 'touch points'. If you’re unable to reach the floor, measure using a Flex Block/Water Bottle OR stack of books/blocks. Once you’re able to reach the floor, measure depth by reaching the floor with; finger tips, knuckles, fists, and palms and in a deficit (standing on blocks and reaching beyond your feet). If you’re able to touch the floor with your fingers/knuckles, then you’re in a great position to start developing your side split. If not, a flexibility training block that is focused on developing your pike is a better place to start. See this article for more info on this.
Another consideration is whether side split work causes pain/irritation to the inside (medial aspect) of your knees. This irritation can be caused by weakness in the quads/abductors, but it can also be a result of form and posture (Are your feet everted? Are your legs externally rotated? How does your femur sit in your hip joint?). For postpartum women in particular, hip adductor weakness and joint laxity can be a significant issue and it may be worth postponing any side split training for now 2. If you're experiencing knee pain/discomfort when trying to improve your side split and you’ve already tried strengthening the quads and abductors, it’s worth consulting a physical therapist for further guidance. If the side split doesn't cause knee pain and your hamstring flexibility is sufficient then you’re ready to progress to the facilitator component of the session.
2. Facilitator
The aim of the facilitators is to warm up through your accessible range so that you’re set up for the rest of the flexibility sequence. Foam Rolling is a helpful facilitator session as it can temporarily increase the length in the muscles targeted and can also provide temporary symptomatic relief for any tension/tightness felt in the muscle. Completing this session before any lengthening work can help to improve the quality of the first set of the session, when you may otherwise be feeling quite stiff.
 ### Foam Rolling
- Select an appropriate foam roller.
- Place the foam roller on the ground and lie on top of it, with the foam roller between the muscle you’d like to target and the floor.
- Roll up and down trying to seek out any particular areas of tension or tightness in the muscle. For bigger muscle bellies, such as the hamstrings, you can also roll from side to side.
- Support the weight of your body with your arms.
- Target the glutes, hamstring and calves.
- Set the intention for the session.
Intention - Gradually build up tension over the first 20-30 seconds. Aim to increase slowly to the maximum tolerable limit. Breathe deeply and aim to allow the targeted muscle to lengthen, increasing the depth/range of the stretch every 10-15 seconds (if possible) to maintain the ‘maximum tolerable limit’.
Recommendation: Complete 1 set of 1 rep (per side) for 30 seconds. 30 seconds inter set rest.
Foam rollers can be soft, firm, smooth, spiky(!) and anywhere in between. If you’re new to foam rolling or you’re feeling particularly tight, you’ll want to start with a soft, smooth foam roller and aim to gradually build up your tolerance. You don’t want to stress the muscle, as this can cause the muscle to tense and this can actually make things worse. Foam Rolling can be followed by Cossack Squats, with the intention of stretching and activating the adductors, improving hip flexion and mobilising the lower limb joints.
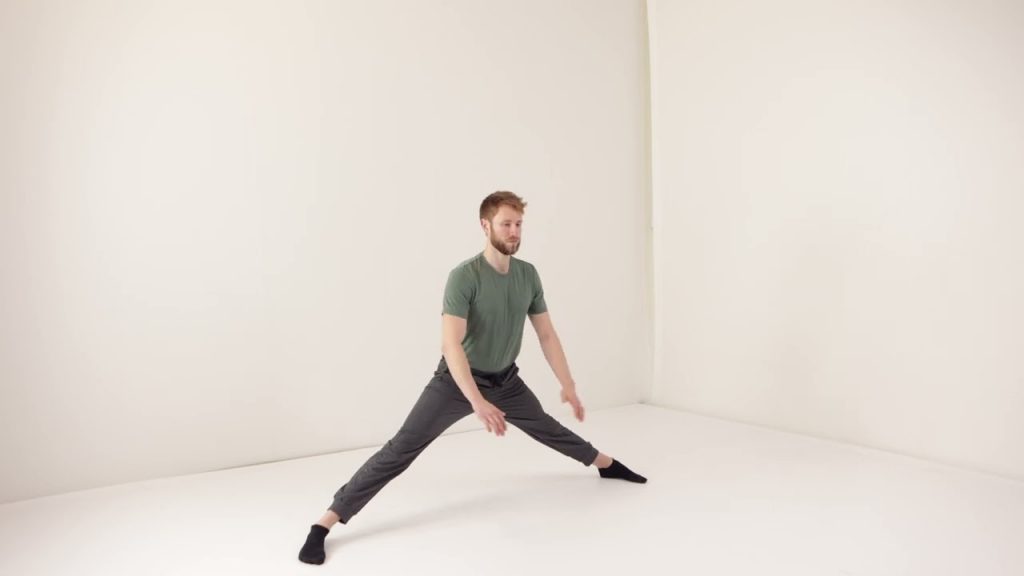
Cossack Squats
- Start standing in a wide straddle. This is neutral.
- Squat laterally (or to the side), making sure that your knee does not travel out further than your foot and then return to neutral.
- Squat laterally to the other side and then return to neutral. This is one rep.
- Set the intention for the session, which is TEMPO
Tempo stretching is dynamic stretching. You MUST move slowly to avoid muscle reflex (tightening of muscles). Moving too fast limits the effectiveness of this stretch. You should also move into the maximum tolerable limit for each rep, aiming to get lower each time.
Tempo is prescribed in 4 phases, each that correspond to seconds:
- 3s – eccentric/lowering
- 2s – pause at the bottom
- 2s – concentric/lifting
- 1s – pause at top
Recommendation: Complete 3 sets of 4 reps with a working rep time of 8 seconds. 60 seconds inter set rest.
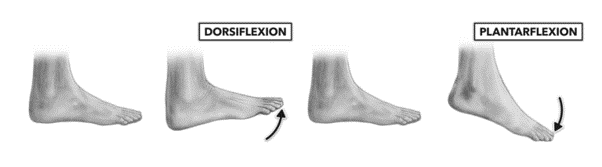
One limitation to this exercise is that you may find it more challenging if you have poor dorsiflexion. Dorsiflexion is the range of motion of the ankle when the toe is lifted upwards towards the foot.
 If you feel like dorsiflexion is impacting your ability to squat laterally onto one leg or if you feel like tightness in the hips is a limiting factor, then you may prefer to use the Post-Hip Capsule stretch.
- Start sitting with your legs out straight and in front of you.
- Place a yoga block on the floor next to your right hip so that you can lean on it for support later on.
- Bend your right leg and fold it under your left, so that it wraps around you.
- Cross your left leg over your right leg, tucking your left foot against your right knee (Yes! Essentially tying yourself in a knot.)
- Wrap both hands around your left knee, squeezing it to lower your body down rightwards and onto the yoga block. Repeat for both sides.
- Set the intention for the session.
Intention - Gradually build up tension over the first 20-30 seconds. Aim to increase slowly to the maximum tolerable limit. Breathe deeply and aim to allow the targeted muscle to lengthen, increasing the depth/range of the stretch every 10-15 seconds (if possible) to maintain the ‘maximum tolerable limit’.
Recommendation: Complete 3 sets of 1 rep for 30 seconds. 30 seconds inter set rest.
Once you have completed 1-2 appropriate facilitator sessions, you can progress to the third component of the flexibility sequence, which is designed to increase the range of motion (or length) in the antagonist muscles, which for the side split are the hip adductors and the hamstrings.
3. Range of Motion / Antagonist
Because this flexibility sequence is designed to improve your side split, it’s useful to include a range of motion exercise that is specific in helping you to work towards this flexibility goal. The Half Split is an effective place to start because it targets the hip adductors and is not affected by the range of motion in the hamstrings. For all side split variations, it’s important that you have a good understanding of how to place your pelvis into an anterior pelvic tilt. For a quick recap on how to do this, have a read of this article.
Half Split ISO
- Start kneeling with your hands out in front of you to provide support.
- Place your pelvis into an anterior pelvic tilt and maintain this for the duration of each rep.
- Take one leg and place it straight and out to the side (laterally).
- Slide the extended leg, until you feel a gentle stretch. Adjust your hand placements and body position, so that your bodyweight is supported by your hands.
- Set the intention for the session.
Intention - Gradually build up tension over the first 20-30 seconds. Aim to increase slowly to the maximum tolerable limit. Breathe deeply and aim to allow the targeted muscle to lengthen, increasing the depth/range of the stretch every 10-15 seconds (if possible) to maintain the ‘maximum tolerable limit’.
Recommendation: Complete 3 sets of 1 reps for 30 seconds. 30 seconds inter set rest.
Now that you have completed the more goal-specific component, you can move on to the Horse Stance, which again provides a great stimulus for the hip adductors.
Horse Stance
- Start standing with your feet together.
- Externally rotate both feet (bonus penguin pose!), keeping your heels together.
- Take your weight through the balls of your feet and then internally rotate your feet.
- Repeat until your feet are wider than shoulder-width apart and externally rotated.
- Squat down, ensuring that your knees track your feet and do not turn inwards.
- Maintain the same height for the duration of the isometric hold.
- Set the intention for the session.
Intention - Gradually build up tension over the first 20-30 seconds. Aim to increase slowly to the maximum tolerable limit. Breathe deeply and aim to allow the targeted muscle to lengthen, increasing the depth/range of the stretch every 10-15 seconds (if possible) to maintain the ‘maximum tolerable limit’.
Recommendation: Complete 3 sets of 1 reps for 30 seconds. 30 seconds inter set rest.
This exercise should be completed at bodyweight initially, but you can progress to adding low loads once you have worked at bodyweight consistently for 4-6 weeks. Many exercises use added weight to assist in the depth or intensity of a stretch. The amount of weight will vary from position to position, the number of reps and with each individual's level of strength. A general rule of thumb is to use just enough weight to take you further than you would otherwise go. But not so much that you feel your stretched muscles working to resist the weight.
Now that you have worked on improving the range of motion, it’s important to target the strength of the agonist muscles, which for the side split is the abductors. Yet again, to make sure that your training is specifically tailored towards the goal of improving your side split, the side split isometric hold is the perfect starting point.
4. Strengthening / Agonist and Antagonist
Side Split Iso - Static Stretch
- Start standing in a straddle.
- Place your pelvis into an anterior pelvic tilt and maintain this for the duration of each rep.
- Carefully slide both legs out to the side (laterally), until you feel a gentle stretch.
- You should be able to stand comfortably in this position, without putting your hands on the floor for support.
- Set the intention for the session.
Intention - Gradually build up tension over the first 20-30 seconds. Aim to increase slowly to the maximum tolerable limit. Breathe deeply and aim to allow the targeted muscle to lengthen, increasing the depth/range of the stretch every 10-15 seconds (if possible) to maintain the ‘maximum tolerable limit’.
Recommendation: Complete 3 sets of 1 rep for 30 seconds. 30 seconds inter set rest.
If you’re relatively new to flexibility training, then the Wall Guided Split can help you to maintain an anterior pelvic tilt for the duration of a rep, whilst also providing additional support and balance in what can be quite a challenging position to hold.
Wall Guided Side Split - Static Hold
- Start standing with two yoga blocks in front of you.
- Gradually shuffle your feet out to the sides (laterally), leaning on the yoga blocks with your hands for additional support.
- Once your feet are reasonably spaced, lean your butt back onto the wall with your pelvic isn't an anterior pelvic tilt.
- Continue to slide the legs further apart with your butt against the wall, until you feel a gentle stretch. You can also continue to use your hands for support.
- Maintain feet planted and in front of the hips
- Set the intention for the session.
Intention - Gradually build up tension over the first 20-30 seconds. Aim to increase slowly to the maximum tolerable limit. Breathe deeply and aim to allow the targeted muscle to lengthen, increasing the depth/range of the stretch every 10-15 seconds (if possible) to maintain the ‘maximum tolerable limit’.
Recommendation: Complete 3 sets of 1 rep for 30 seconds. 30 seconds inter set rest.
Once you have completed the Side Split Iso session, which is the most specific strengthening component of this flexibility sequence, you can conclude your session by strengthening the antagonist muscles (adductors), which can be done using a Copenhagen Plank. The advantage of using this exercise is that it provides a great stimulus for the musculature of the core and shoulders too.
Copenhagen Plank - Strength Development
- Lean on one side next to a block or box. The greater the height of the block/box, the higher the intensity of the exercise.
- Extend one leg out to the side (laterally), placing the side of your foot onto the block/box.
- Push your weight through the extended leg to move the hips upwards, keeping your other leg bent underneath. Keep your core muscles tight and your shoulder engaged.
- Set the intention for the session.
Intention - An integral part of developing flexibility is the ability to control and display your full range of motion using your own strength.
Recommendation: Complete 2 sets of 2 reps with a working rep time of 15 seconds. 15 seconds inter side rest. 30 seconds Inter Rep Rest. 30 seconds Inter Set Rest.
The Copenhagen Plank is a particularly challenging exercise, so you may find it more appropriate to complete the session described above, but starting with a bent leg variation first for 4-6 weeks.
Copenhagen Plank - Bent Leg - Strength Development
Push weight through the leg to move hips, keep bracing the core
As with all flexibility training, consistency is key. You can expect to work on this flexibility sequence for 8-12 weeks before you start to see some measurable improvements. Measuring your side split before starting your training block will help you to track your progress over time and this can be done using a Side Split Test.
Side Split Test
- Complete the Side Split ISO exercise, as described above.
- Measure the distance between your two heels to obtain your side split score.
- Retest upon completion on each 8-12 week flexibility training block.
If you've found this article helpful, you may wish to read our other articles in the series:
- Improve your pike
- Improve your pancake
- Improve your side split / middle split
- Improve your front split
Together, all these exercise sessions can be used to improve your lower body flexibility for climbing.
For a more accurate assessment of exactly where you need to start on your flexibility journey, you may be interested in our free My Flex Assessment
Interested in flexibility training plans or learning more? Check out our Flexibility Training Plan or our Flexibility Deep Dive course!
- Determinants for Success in Climbing: A Systematic Review ↩︎
- Muscle Strength During Pregnancy and Postpartum in Adolescents and Adults ↩︎
Comments (0)
Be the first to leave a comment.