How Lattice Training Developed The MXEdge (Part 2)
Last month, we released the MXEdge Lift, our latest finger strength training tool. We quickly became aware that people wanted to know more about our R&D process, how this led to the compound curve edge design, and what defined its geometry.
Our aim is that, by the end of this article, you’ll know where we started in our design process, where we are now (with rationale for this process), and where we expect to go with future finger strength training edges.
This is a 2-part article. Part 1 covers the differences between the designs and functions of regular, unlevel, and MXEdge training edges can be read here.
Since the early days of Lattice Training, we have always aspired for symbiosis between our products and research. Our original product, the Lattice Board, was used by Tom and Ollie to perform the early research that paved the way for our present-day database. Now, our data informs our products, and in turn, data collected on these products reveals climbers’ strengths and weaknesses, and helps us measure and track our performance. When developing our products, we aim to address a specific training need, and back it up with product research and the collective experience of our coaching team.
In the beginning, there was a 20mm training edge…
A long, long time ago, there was a certain Tom Randall who was obsessed with climbing training, and in particular, the profiling of elite climbers. Between 2008-2009, he began to create what was eventually to become the Lattice Board profiling assessment. It put climbers through a series of tests to determine everything from strength to endurance. As part of this testing, he had climbers complete a maximal, single-arm deadhang on a rounded 20mm edge.
His initial testing edge used a piece of 20mm wood with a home-DIY rounded front edge. Not exactly fancy! After a period of initial data collection, Tom realised that testing had to be even more consistent. This spurred him to produce what became ‘The Original Testing and Training Rung’. The design process incorporated the following inputs:
- Tom spoke to Ned at Beastmaker to determine their own approximate edge geometry so that any climbers testing and training on either a Lattice or Beastmaker edge would have a roughly similar experience.
- One of the original founders involved with Lattice products – Dale Comley – designed and engineered a tulipwood testing edge to be suitable for mass production that would have a prettier aesthetic than Tom’s flat DIY strip of wood!
- Tom (and also Ollie, who had joined him by that time) wanted the front radius of the testing edge to be particularly rounded (10mm radius) so that climbers were less able to ‘drag’ the edge using friction, as opposed to strength and active engagement, to complete the maximal hangs.
For the next 10 years or so, tens of thousands of climbers around the world tested (and trained) on this edge, inputting data into our performance profiling models and ultimately creating both a database of strength metrics and a population of climbers who got strong training on our simple 20mm edge. We were the first people to produce peer-reviewed research on our testing and profiling methodology and as a consequence, we continued to use this tool for quite some time.
This all sounds great, but you might be wondering: how did this simple 20mm edge become the MXEdge Lift? Well, this comes down to the usual balance of weighing up the pros and cons of a particular method or tool for climbing training.
The pros of the Original Rung were:
- Extremely reliable testing for performance profiling, backed up by data and research.
- Accessibility of the global climbing population to a consistent edge geometry that was mass-produced.
- Comfortable testing and training due to the highly rounded front edge and choice of wood material rather than resin/PU.
- It was very simple for climbers to use. There was just a 20mm edge and a warm-up jug. Nothing more.
The cons of the Original Rung were:
- Almost no climbers (except for elite pros) could complete single-arm deadhang work as it was so hard an edge to hold.
- Loading of all the fingers wasn’t even or maximal.
- It wasn’t the sexiest-looking fingerboard ever and, unfortunately, looks do make a difference!
In the middle, there were pick-up devices…
The middle part of this story took place between 2020-2024. During the coronavirus years of 2020-2021, we saw a huge explosion in the interest and use of portable ‘pick-up’ or ‘lifting’ devices that focused on finger strength or grip strength. Our own launch of the Crimp & Pinch Block landed on the market with Tension Climbing’s The Block and Metolius’ Wood Rock Rings. Reassuringly, thousands of climbers saw marked improvements in finger strength and training motivation off the back of highly accessible and sport-specific training devices like these.
Following the post-COVID revolution in ‘pick-up’ training tools, we decided to up the game again, specifically on pinch strength training tools. Out of this was born the Quad Block, a blend of materials and know-how from the sports of climbing and arm-lifting.
What we learned from the Quad Block and other lifting devices, was:
- Climbers and arm-lifters were consistently getting stronger using them and found them motivating to use.
- Athletes wanted to incorporate these products into both their training and testing sessions throughout the year.
- All users were adamant that comfort and ergonomics were super important when it came to training.
By 2022, we were psyched to see climbers worldwide, including our own coaches and team, reaping the benefits of these training tools. It wasn’t just a fad! However, when it came to an ‘edge-specific’ pick-up device, we felt that there was room for innovation. We had the opportunity to create a new design that aligned with current knowledge, as well as, the experiences of our coaches and clients. Our current offering, the Mini Bar, was a great warming-up tool, but it lacked the consistency needed for testing and training. We wanted to create something that would endure for another decade or more, just as the Original Testing and Training Rung had.
So what did we do?
We began another round of research and development with our new development team, comprised of our coaches, researchers, and an in-house product designer.
As with all novel product development at Lattice, we use a ‘first principles’ design approach in the creation of our own lifting edge concept; throwing out all our existing ideas of what a product should be and instead asking: What are we trying to achieve? With this product, we are looking to optimise finger strength training using off-the-ground lifts.
We must then consider all the variables and how they interact: materials, surface textures, hold shapes, edge depths, grip positions, training protocols, mounting methods, and more! Overwhelmed with the number of variables at play, we needed to break each one down, consider all the possibilities, test what we could, and combine them to create what we now know as the MXEdge.
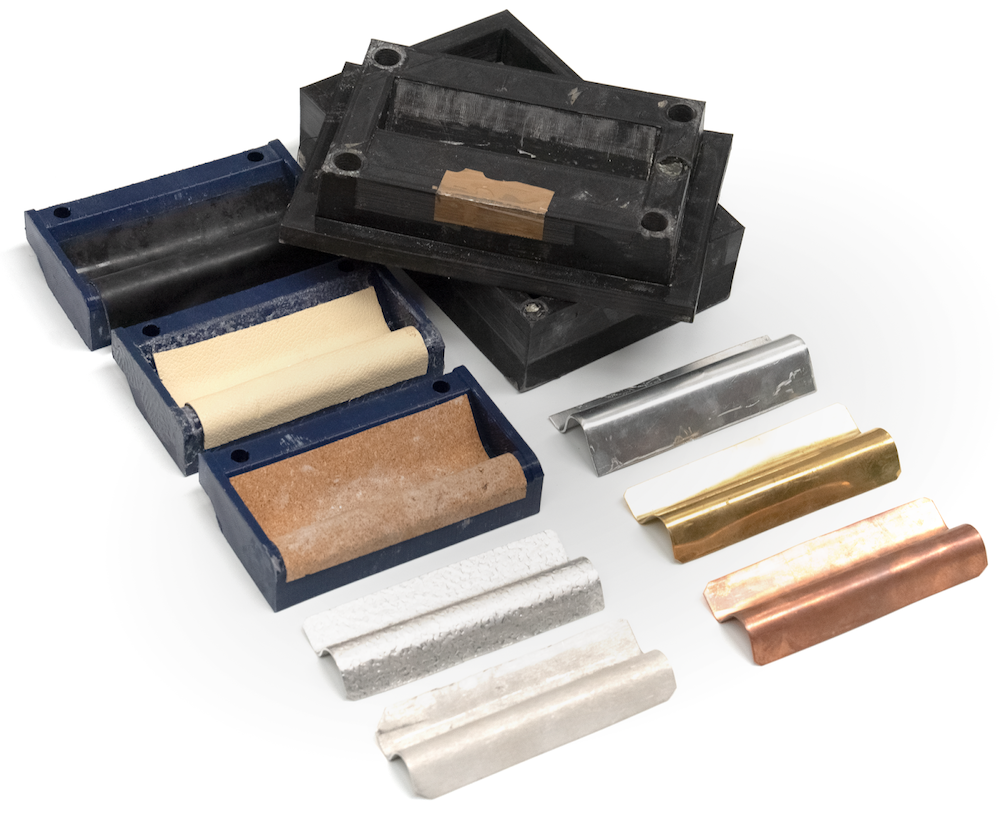
** Early prototypes made when exploring different form factors for lifting blocks
To do this, we had our in-house PhD researcher, Cam Hartley, carry out an academic literature review to determine:
- The best methods for quantifying finger strength
- How edge size, angle, and isolated finger force changes over varying grips and holds
- What causes discomfort on an edge
- Injury prevalence patterns in climbers
We also interviewed a number of physios, healthcare professionals, athletes, and coaches to determine:
- What physios are currently recommending
- What our coaches are prescribing in their training plans
- What athletes need when it comes to training
The final piece in the puzzle was to try and define ‘comfort’ when it comes to strength training for the fingers. We knew the general feedback, but what would happen if we dove a little deeper?
At this point in 2022, it is worth noting that we’d investigated both flat ‘regular’ training edges and ‘unlevel’ training edges. The former was due to the regular training edge being the popular status quo and the latter through Tyler Nelson who presented us with his unlevel edge concept. After the initial prototyping of various designs and feedback from users, we decided that an unlevel training edge was not the direction we wanted to go. We needed to explore something different.
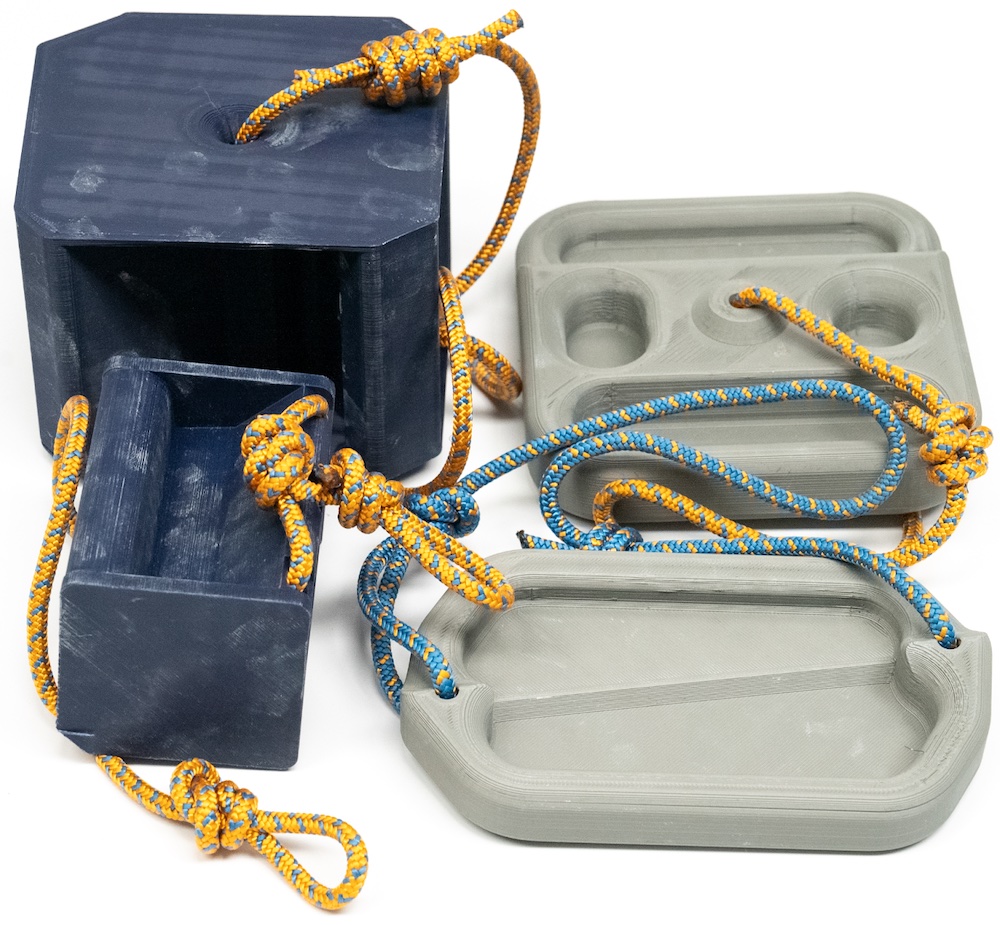
** A prototype hold used to test the unlevel edge concept.
So what were our next steps to design an edge that prioritised the ‘comfort’ element but was also suitable for both data collection and training.
Step 1: Create a 3D parametric model that would allow us to rapidly prototype and test edges with varying edge geometry.
(This allowed us to play with edge depths, curves in both planes, variable front and back edge radii, fall off angle, and slope angles).
Step 2: Run ‘build an edge’ workshops with our coaches and athletes where they could choose which variables they wanted to change based on their experience and knowledge.
Step 3: Create a series of diametrically opposed prototypes so that we could compare variables of consistent surface area with our coaches and athletes.
Step 4: Design ergonomic studies to compare those variables and gather enough data to objectively determine the most comfortable shape.
If you just want to read the conclusions, scroll to the bottom of this article, otherwise, if you’re a total geek like us, read on!
**Various prototype edges that were 3D printed and tested for comfort
After running our workshops and having long discussions within the team, it was clear we couldn’t agree on which edge was most comfortable and we all wanted something different. It was even hard to decide personally which edge was comfier! We were left with a question: how do we objectively compare the variables? How do we measure comfort?
Diametric Testing: From previous testing, we identified edge depth, edge angle, front radius, front curve, and top curve as having the most significant effect on the feel of a training edge. Therefore, we prototyped diametrically opposed 20mm edge geometries for each of these variables for testing.
In the below image, you can see the designs for the prototypes used in our top plane curve edge testing. The left has a convex top plane curve, the middle is a regular 20mm edge, and the right has a concave top plane curve.
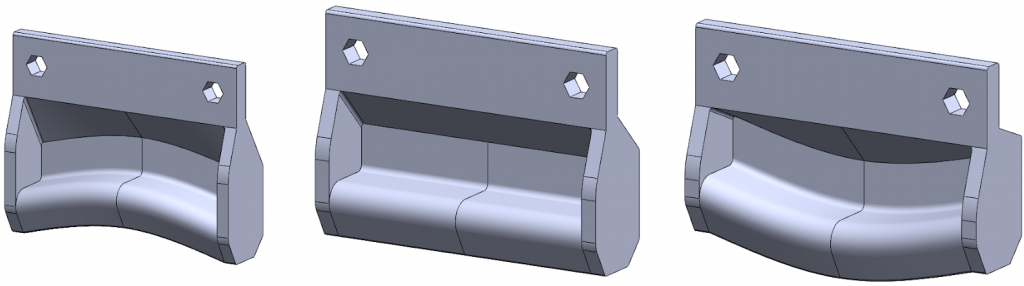
**Diametrically opposed top curve edges. Left is a convex top plane curve, the middle edge is a regular 20mm edge with a standard edge radius, Right is a concave top plane curve.
Variables like top plane curve are simple to compare, but what about variables that affect the size of the edge like depth, radius, and angle? So we could compare these kinds of changes, we made sure to maintain the equivalent surface area as on the regular 20mm edge. This meant if we increased the radius on the end, we would equally decrease it in the middle to average it out across the entire length.
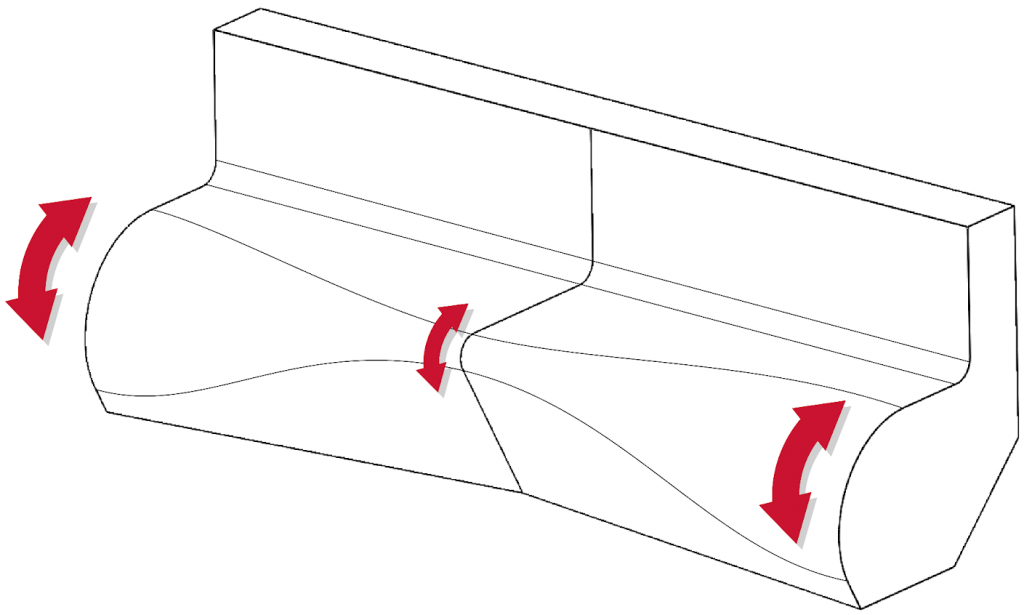
The variations were symmetrical, and were all centred on the loading plane. If we increased the edge depth in the middle, we would decrease the edge depth on the ends, maintaining the same total surface area available for the four fingers. This was critical in our testing, as otherwise participants would just pick the biggest edge as the comfiest.

** Example summary data from one our testing rounds
The findings were:
- Edge depth, edge radius, and frontal curve had the strongest consensus on comfort.
- Those with a small pinkie drop preferred deep middle edge depths & larger radius on the outer edge. (This would indicate that those with a large pinkie drop prefer a regular flat edge but more research with a better methodology for hand measurement would be required to really understand this interaction).
- Those with a higher hangboarding age tended to prefer regular edges, we attributed this to the familiarity with an edge they had become well adapted to.
Refined prototype testing: Now we had discovered 3 variables from diametric testing that had a consensus on being an improvement over a regular edge, we could now tweak the intensity of those variables to hone in on the magic formula that would objectively be the most comfortable edge geometry.
We made a new set of 3 models for the three variables, each increasing in intensity i.e. moving further away from a regular training edge. Each participant in the tests was supervised by a coach and had 4 comparison tests to make. For the first 3 tests, participants were given 3 different sets of edges, where each set tested a single variable. The edges in a set were the same, apart from the variable that was being tested. This variable was altered to different degrees across the edges of a set. A regular training edge was also included in each set. They were also provided with a Tindeq and a set of weights on a lifting pin so they could properly compare each edge, pulling as hard as they liked.
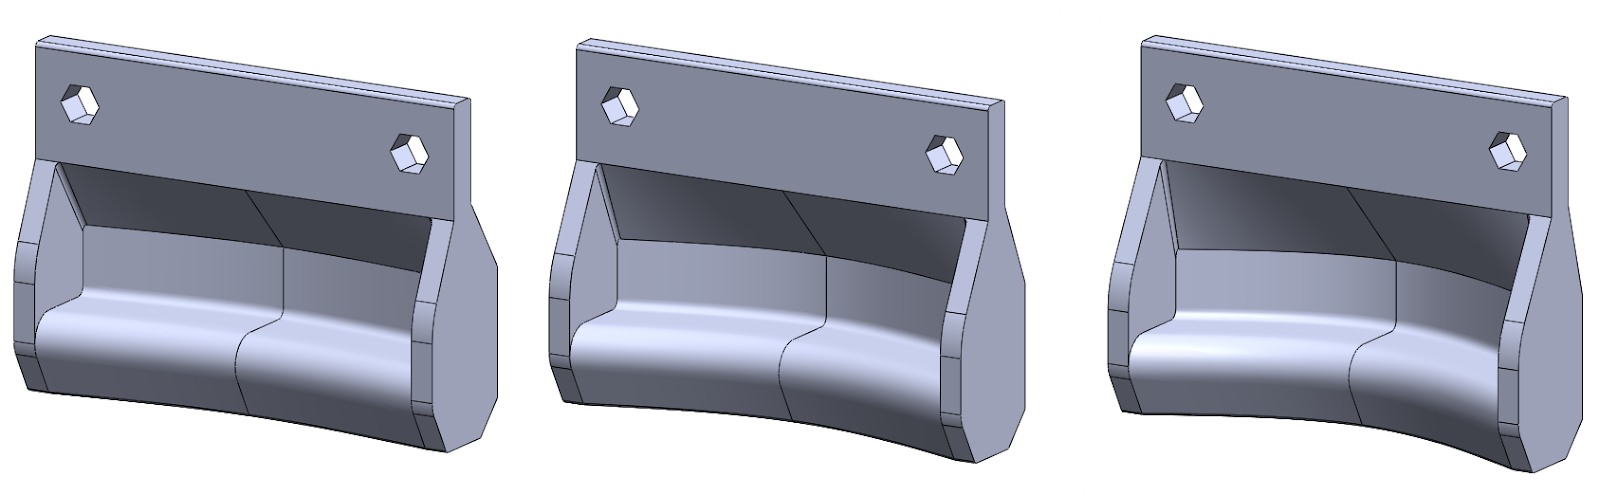
**Variable graded front plane curve edges. Left to right increasingly curved edges in the frontal plane.
In the final test, participants compared our mixed variable (MX) prototypes. These were edges where several variables were combined on one edge. One of these prototypes (MX4) stood out from the other edge shape options as the favourite. And hence became the MXEdge!

** Mix 4 became the MXEdge of the May 2024 product release!
It is worth noting that this was a process of design research and not academic research. More work will need to be completed over the coming years to understand more about edge shapes and further refine the knowledge we all use.
In the end, there was the MXEdge Lift…
By early 2024, we’d defined what was to become the MXEdge and began sourcing our manufacturing partner here in the UK to create the finished MXEdge Lift product.
We were convinced that we had created a brilliant tool that would complement the finger strength training climbers have been completing for decades! Maybe, we’d even taken it one step forward…
Where we were unsure was how to communicate the significance of what we’d designed and what set it apart from other finger strength training tools so that climbers could make an informed decision. Our aim was (and still is) to communicate the following:
Comfort is key – climbers will be able to exert more force during testing and training if an edge is designed for maximum comfort. More force will result in greater potential for training optimisations in strength training.
Maximal loading over even loading – the more we’re able to maximally load the muscles, the greater the training potential.
Humans come in all shapes and sizes – once we’d defined the MXEdge shape, we tested it in a variety of sizes (edge depths) and found that participants experienced consistent levels of comfort. Whether it was the equivalent of 20mm or 10mm edge, climbers felt supported in their joints.
There is no ‘best’ training edge – at present, there is only ‘different’ until we’ve completed more research, spoken to more climbers with training experience, and analysed strength data over the years. We believe that MXEdges, unlevel, and regular edges all have their place in the training ecosystem.
The last question some of you may be asking – especially if you have a good memory for where this article started – is where are we heading with training edge designs? This will be determined by the following inputs:
- Research studies analysing the use of regular, unlevel, and MXEdges over next few years. We already have a study in process with one of our university partners here in Sheffield.
- Observations from the climbing community in their experiences with different edges and the results that come from training on them.
- Climbers shared knowledge. We may not all agree or find the same results, but together, we’re better informed.
Comments 8