What makes the Lattice Training MXEdge different from other edges? (Part 1)
In the last few years, we’ve seen the introduction of a variety of portable hangboards (a.k.a. lifting edges, lifting blocks, no hang devices, pick-up training devices) which have started to change the game in terms of how the fingers are loaded through non-regular edges – including our own MXEdge Lift.
Whilst all these tools work on the same principle (lift weights, apply force through the forearms and get strong), they all have their subtle differences! In particular, with the release of our MXEdge and the confusion we’ve seen between different edge types, we thought it would be useful to explain some of the differences between edge shapes and designs.
In this article, we will cover:
- Regular training edges
- Unlevel training edges
- MXEdge training edges
With each edge type, we’ll aim to explain what these edges look like, how they work from a geometry perspective, and what differences they may make to your climbing and training. It’s worth noting that we included the word ‘may’ in that previous statement because, like many new concepts in climbing and training, there is a degree of educated guesswork. We carry out our research and do our user testing, but ultimately, it’s very rare to know for certain how something works in sports performance. It can take several years, and potentially the backup of longitudinal studies, to support initial findings and theories.
This is a 2-part article. Part 2 explores the research and development of the MXEdge and can be read here.
What is an ‘edge’ in climbing?
An ‘edge’ in climbing typically refers to a type of hold that is categorised by a small, horizontal ledge or lip. (Also, known as a crimp).
Edges on products like hangboards, campus rungs, and lifting edges seek to replicate these edges that we find on rock, in a simplified form, to enable climbers to train their finger strength.
What is an ‘edge’ in geometry?
Whilst climbers have adopted the word ‘edge’ to refer to crimps and smaller finger-tip sized holds, in geometry, the definition is different: an edge is the straight line where two faces meet.

In this article, when referring to an edge used in training for climbing, we will use the term ‘training edge’. When we are talking about geometry and the shape of training edges, we will use the term ‘edge’.
What is the geometry of a training edge?
The following aspects of a training edge are the most important ones to pay attention to and you’ll see that training edges have more variables than you potentially realised!
- Back face
- Top face (this is where your fingers sit)
- Front face
- Back edge
- Front edge
- Back radius
- Front radius
- Edge depth
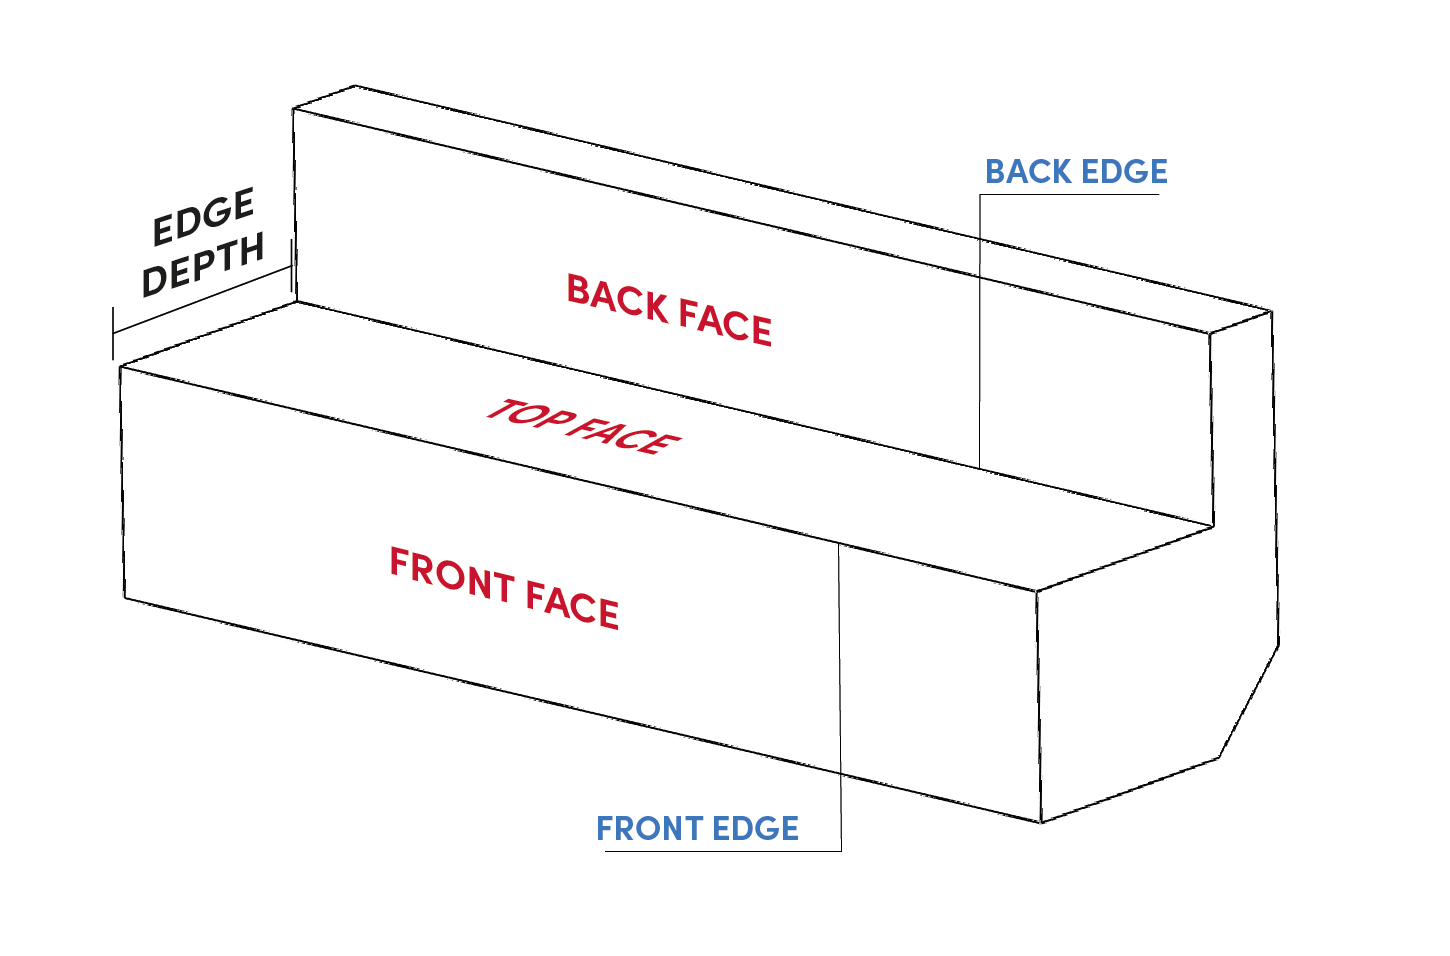
Whilst you could train on the above edge, it would likely be uncomfortable due to its sharp edges. The feel can be improved by adding a front radius and back radius.

Traditionally, edge depth and front radius have the biggest effect on the feel and difficulty of a training edge.
The Regular Training Edge
The type of training edge that most climbers around the world will typically associate with a fingerboard, campus board, or pick-up device is the regular training edge. Many will recognise these from classic fingerboard designs, such as The Beastmaker, Lattice Triple Rung, or a Moon Fingerboard.
What does a regular training edge look like?
The regular training edge is the simplest type of training edge.
The back face, top face, and front face are flat and joined by a front and back radius of varying depths, depending on the product you’re using. The training edge has a continuous profile along the length with no curvature.
How does a regular training edge work?
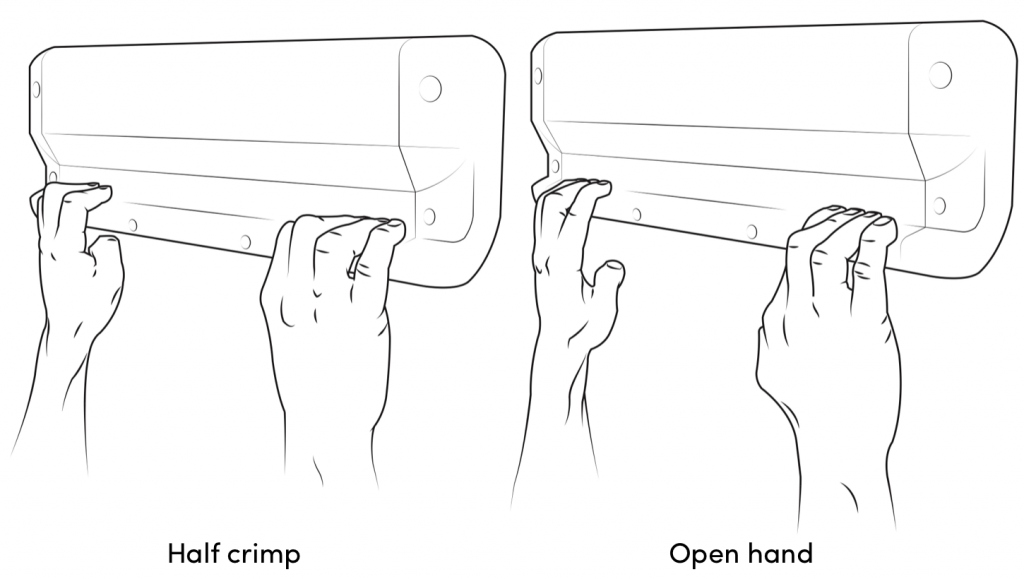
Typically, a training edge is held with 4 fingers, either in open hand or half crimp.
To flex the fingers, we use two muscles, the finger flexor digitorum profundus (FDP) and the flexor digitorum superficialis (FDS). Grouped, these can be categorised as the finger flexors. For stability, the extensor digitorum communis (EDC) is also activated.
How does a regular training edge benefit my training?
By loading the fingertip, tension is generated along the tendons attached to the finger flexors (and extensors). We can assume that this tension is transferred to the muscle, stimulating it.
The greater the load, the more force is required to move or hold the load, resulting in a greater recruitment of motor units. When we train on a regular training edge we are aiming to recruit our motor units and activate a number of other physiological and biomechanical mechanisms that ultimately will cause improvements in strength, strength endurance and endurance. Note that these changes are not simple nor mutually exclusive and we’ve not specifically addressed other factors such as strength skill. At the end of the day, the general premise in loading our fingers in climbing training, has been that loading will cause improvements in finger strength and this has proven to be true, born from decades of climbers completing successful strength training cycles using training edges. In other words, we know from experience that training on regular edges – not matter what the mechanisms for improvement have been – is effective. The question is now whether we can be even more effective.
Whilst the regular training edge certainly benefits us climbers in our goals, there are some potential limitations. This list can get quite long and could take us down a major rabbit hole which is beyond the scope of this current discussion! However, in reference to the topic at hand – training edge geometry – one key issue is that on a regular training edge, some fingers are in a half crimp, whilst others are in open/drag position. This means that these fingers experience different levels of force to the tendon, resulting in potentially suboptimal strength adaptations. Some of you reading this may be thinking that we’re saying that regular training edges are a disaster and that they’re not the way to train – this is not what we’re saying! We’re pointing out that there may be other ways to look at how we load the fingers if we’re really trying to hone down on the most optimal way to do so. We’ll say it again, climbers have been using regular training edges for years and they still most certainly have their place in our homes and gyms for years to come.
So now the question is, what could potentially be better?
The Unlevel Training Edge
Whilst the unlevel training edge has come into the limelight in recent years especially through the work of Tyler Nelson, this is not a totally new concept. In fact, it’s quite an old one. However, previously, it was poorly executed, and no one had specifically addressed the sports science logic behind how they could work to load the fingers.
What does an unlevel training edge look like?
Unlevel training edges deviate from regular training edges as the top face is not flat.
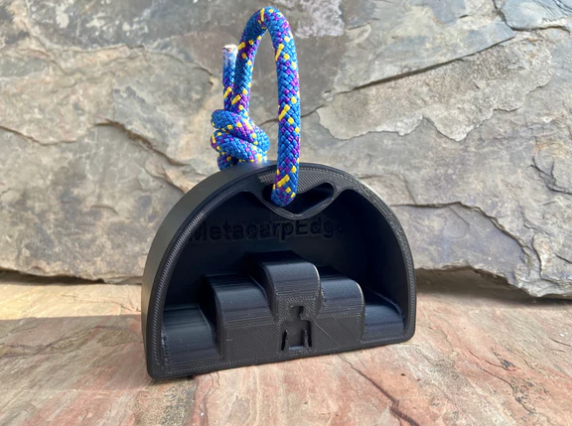
One design is a ‘stepped’ unlevel training edge where the top face is divided into steps. Seen in the MetacarpEdge below, each step is a different height.
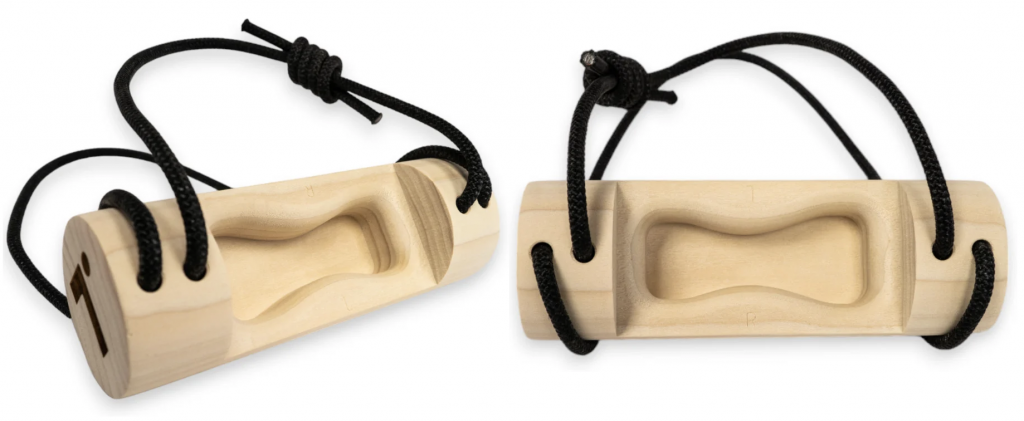
Another design from Tension Climbing that was developed in collaboration with Tyler Nelson is the ‘smooth’ unlevel training edge. The top face rises and falls in height, following a curve.
The variable that all unlevel training edges have in common is a non-flat top face. Other variables will vary based on their individual designs. However, you will notice that edge depth and front radius in particular, remain constant across the length of the training edge.
How does an unlevel training edge work?
As we stated earlier, because our fingers are all different lengths, using a regular training edge might mean that not all our fingers are in a half-crimp position. This could result in sub-optimal training adaptations or possibly issues with injury risk.
A commercial mass-produced unlevel training edge makes a broad assumption of the population’s hand size and changes height to compensate for each finger’s different length. A customised ‘one-off’ unlevel training edge could be produced to the exact hand morphology of the climber so that each finger could in fact be loaded at the desired angle. Needless to say, both commercial and non-commercial designs have their pros and cons and ultimately the concept aims to help the user load every finger in a manner that improves their training outcomes.
How does an unlevel training edge benefit my training?
Several studies have shown that the fingers experience different forces on a regular training edge (Vigouroux et al, 2008, Fuss and Nigel, 2023, Hartley et al, 2023). The idea behind unlevel training edges is that, with each finger in half crimp, the load is meant to be equally distributed across each finger pulley. In theory, if this is correct, it could mean that, when compared to a regular training edge, the user should be able to create higher levels of recruitment in the muscle fibres, meaning that our strength training is more effective. There is also an argument to say that loading each finger more evenly, will reduce excessive stress on certain fingers and, therefore, has a positive impact on injury risk.
However, as stated at the beginning of this article, a lot of these concepts are still heavily based on educated guesses (which, as we pointed out, is a reasonable starting point!) but until peer-reviewed research has been published to confirm whether unlevel training edges achieve these objectives, we’re at the mercy of anecdotal evidence, collective experiences of climbing coaches and trainers, and injury incidence data.
The MXEdge Training Edge
Like the unlevel edge, the MXEdge training edge is not an entirely new concept in some ways. There have been a few training edges over the years (commercial and non-commercial) where either a single- or double-finger pocket has been recessed into the back face to allow one or more fingers to sit ‘deeper’ on the edge. Where our training edge differs is in the complexity and number of changing surfaces, which you can see below!
What does the MXEdge look like?
An unlevel training edge changes the height of the top face, however, the top face on the MXEdge is flat. The easiest way to describe the shape of the MXEdge is to compare it to a regular training edge….
Step #1: Vary the front radius along its length
The front radius is larger at the ends and smaller at the centre of the MXEdge. Through testing, we discovered that users preferred a training edge with a larger radius on the end where their pinky and pointer finger was positioned.

Step #2: Vary the edge depth along its length
Next we increased the edge depth at the centre and decreased the edge depth at the ends.

Step #3: Bend the training edge in the frontal plane
Like popping an ice cube out of an ice tray, the entire training edge is pushed in its centre and pulled back at the ends.

Now we have the MXEdge!
(Please note: the curves in the diagrams have been exaggerated for illustrative purposes. The edges on the MXEdge Lift are not as extreme.)
How does the MXEdge work?
The aim for the MXEdge was to develop a training edge guided by a metric that could be measured consistently and easily, as force delivered to individual fingers is so tricky to measure. You might think that the obvious alternative choice might be total load to the fingers.
However, we opted for a different metric: comfort.
You might be thinking that load is still more obvious, but as you’ll see below (and also in our article about researching and developing the MXEdge), we can still address the loading factor once we’ve catered for comfort.
Firstly, let’s note, comfort still comes with its imperfections as a metric. What one person finds comfy, another person might not. Humans are very different in their hand morphology! So we tested 7 different variables of training edge shape with climbers, coaches, and athletes, asking them to score each variation for comfort when pulling at max force – you can even see Ollie Torr holding some of the crazy prototypes and shapes we tested in this YouTube video here. From this product research, we discerned which variables were more consistently rated as comfier and applied these to the MXEdge.
How does the MXEdge benefit my training?
By focusing on comfort, we hoped to achieve two main goals: maximum consistency and maximal loading to the fingers. These two factors are rooted in our fundamental training principles, which are always at the core of Lattice’s design philosophy.
How does improved comfort affect these two things?
Maximum Consistency – Many climbers focus on lifting as heavy as possible, placing less emphasis on another aspect of their training that is equally important. That is consistency.
Adaptation after an individual session is relatively small, however, these small improvements add up over time; this is why, when we’re focusing on finger strength, training regularly at a consistent (and appropriate) intensity over a period of time is essential for making gains. If a training edge is comfortable and allows a climber to ‘access’ the highest training intensities, they are more likely to be consistent and, thus, achieve greater training outcomes. Our coaches frequently note that climbers are far more likely to stick to training that they enjoy, and discomfort is a common cause for training cessation.
Maximal Loading of the Fingers – Climbers can pull harder on a comfortable edge (imagine pulling on a wobbly, sharp micro crimp… now imagine pulling hard on a flat crimp that supports your whole fingertip). This theoretically translates to maximal loading of the forearm muscles and higher levels of recruitment. Therefore, by boosting comfort, we expect to also improve training performance through increased loads.
Once the MXEdge was developed, we completed a round of testing with coaches and climbers to discover whether the comfort-first approach translated into improved lifting performance, and we were pleased to discover greater loads being applied.
For this testing, we compared athletes’ performances on the 20mm Lattice training edge (a regular training edge) to their performance on the equivalent MXEdge with the same surface area.
Which training edge is the best…?
This is the million-dollar question that everyone is hoping we’ll answer…
Unfortunately, there is no definite conclusion yet, and our experience tells us that almost certainly no one edge shape or design is ‘better’ than another. In reality, it’s about accounting for the pros and cons of each and matching that up with your own individual needs and preferences. When it comes to the specific choices to using the MXEdge for training, we’ve put a few scenarios below that we think line up well with adding in this edge geometry to your training
- Climbers who’ve been training on regular training edges for years and are seeing limited or no improvements from finger strength training
- Climbers who find regular training edges uncomfortable on their skin and joints (especially index or pinkie) and struggle with accessing their maximum training intensity as a result.
- Climbers who despite controlling for appropriate training load (volume, intensity, frequency) still seem to pick up injuries on other edge geometries
- Climbers who want to add variety into their finger strength programs without changing other variables such as edge size, load or hold angle.
Here’s a couple of FAQs we’re happy to answer
Q: Have you abandoned your classic Lattice 20mm edge?
A: No. We still see great use and value in regular training edges depending on the situation.
Q: Which training edge is best for strength training?
A: There is no ‘best’ that we can be sure of. We think that regular edges, unlevel edges, and the MXEdge all have their place in climbing training.
Q: Has your device been load tested?
A: Yes. We’ve loaded both MXEdge Lifts to 400kg+.
Q: Which size is best for me? MXL or MXS?
A: You can use our PDF size guide to measure your own middle finger and work it out!
Q: What does MX18 mean? Why aren’t the edge sizes listed in millimetres?
A: Due to the unique geometry of the MXedge design, the true depth of each edge varies across its length. To avoid confusion, we’ve listed the edge sizes on the MXEdges to indicate their equivalent edge size based on the surface area available for the fingers. For example, an MX18 has a similar surface area as a regular, straight 18mm edge. In reality, because of the improved ergonomics of the MXEdge design, the MX18 will often yield the same load scores as a 20-22mm edge (depending on the individual). If you’re wondering what the letters stand for, the MX term is shorthand for ‘mixed variable’ edge.
Finally, please remember training is highly individualistic. Next time you’re at your local climbing wall or climbing shop, have a test of their training edge selection on the hangboards and lifting blocks. Which feels comfiest in your opinion? Which do you prefer?
You have the best chance of sticking to training that you find enjoyable and motivating.
Comments 2